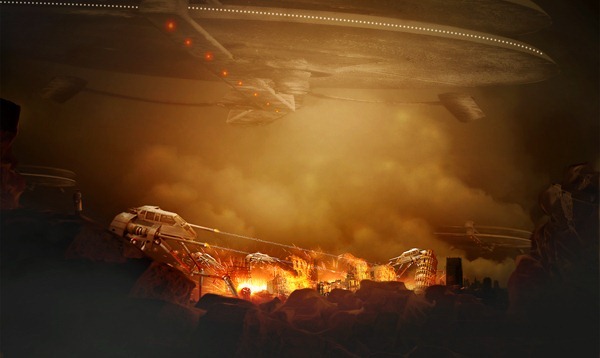
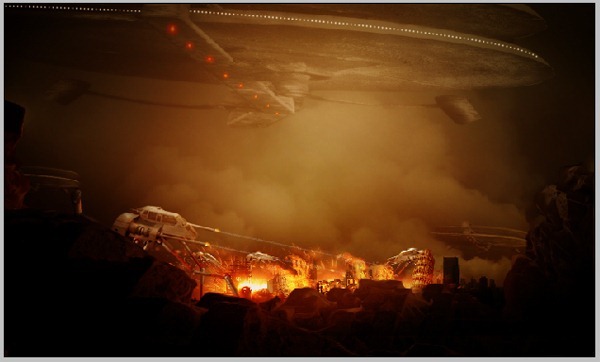
Preview of Final Results
City Destruction Photoshop Tutorial
Resources
- Ruin for Foreground – Pxleyes
- city – sxc.hu
- Tower – sxc.hu
- Building – sxc.hu
- Industry and Smoke – sxc.hu
- Spark – sxc.hu
- Fire – Thanks mattthesamurai deviantart
- Flame – Thanks shaedsofgrey Deviantart
- Space craft – Pxleyes
- Craft – Deviantart
- Hoops – Pxleyes
- Old Man – Deviantart
Step 1
Open Photoshop and create a new 1280×768 pixel document (File > New).
Step 2
From this step on, we will manipulate the foreground for the scene. Open the ruin picture on the canvas. Rotate the picture. Take Pen tool in the tool panel. With the pen tool, we will cut out some part of the ruin picture to be used in manipulating foreground. Trace the part of the ruin in the picture (marked in red in the illustration picture). When the path is closed, right click on it to show the path command option and choose Make Path selection. Finally hit Del to delete the other unselected part.
Step 3
Next, scale the cut out to fit the canvas. Duplicate (Ctrl+J) it some times as needed and place the duplications in the position where needed. If we have had the desired result, merge the layers to make them a single layer. I named this layer main forground. Please see the illustration picture to see the result I created.
Step 4
Add more ruin to the left part of the canvas. I named this layer left foreground. Now we have done the foreground. Select the layers for the foreground. Hit Ctrl+G to group them. I named this group foreground.
Step 5
After creating the foreground, proceed to manipulating a destroyed city to the canvas. Open the city picture in the canvas. This will be a new single layer in the layer panel. I named this layer city. Put the cursor on the city layer and then double click on it to show Blending Options window. Go to This Layer. There are two sliders on it, the black one and the white one. Click the white slider to the left at 110. Please see the result I created in the illustration picture.
Step 6
What I did next was locating and scaling the city to fit the canvas. I duplicated the city layer and set the duplication layer to Overlay Blending at 100% opacity. Finally, I kept the blending of the original layer at Normal and reduced its opacity at 43 %.
Step 7
Proceed to add more building to manipulate a city. Open the tower picture. Extract the tower from its background. Flip it horizontally. Next is to give destruction effect to it by applying the Blending Options almost similar to what I did in previous step (step 5). For this extracted tower I gave the Black slider amount of 40 to get the result like the one I created. Finally, give this layer a layer mask. Choose Spatter Brush to mask a little bit the upper part and left edge of the tower. Finally, I placed and scaled the tower to the canvas.
Step 8
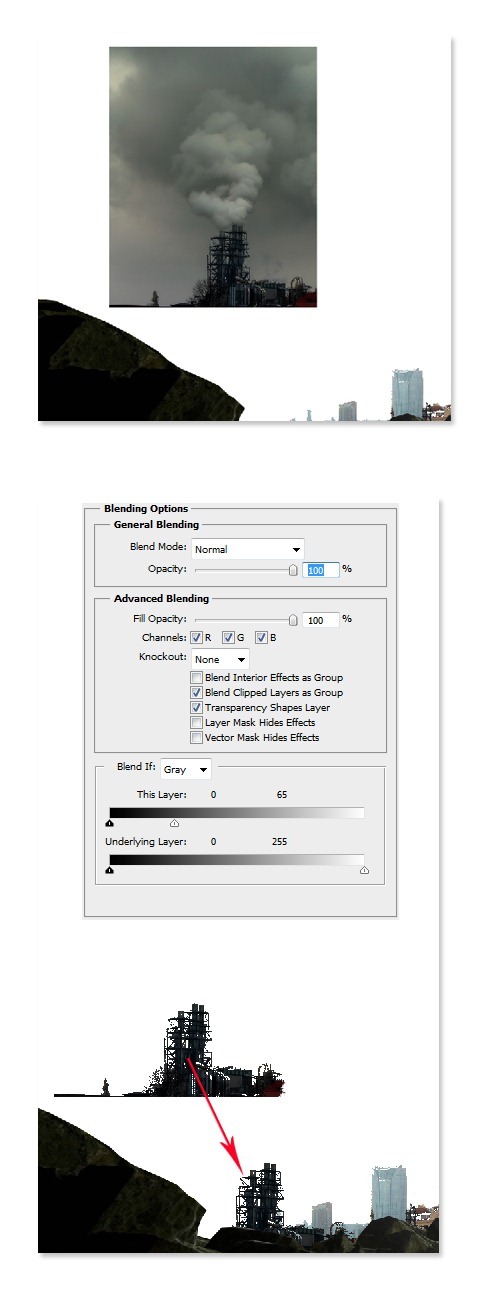
Again, like the previous steps (step 5 and 7), I added another building to the canvas. After giving the building destruction using Blending Options (please see the setting for the blending options), I gave a bit more destruction to upper part and edges of the building like I did to the tower in step 7. Finally, I located it to where needed on the canvas.
Step 9
Still, I did more destruction to the other building. Open the source picture on the canvas. I named this layer industry. Just destroy the industry just like I did to the previous building. Please see the illustration for the setting. Finally locate the picture in location where needed.
Step 10
To complete the destroyed city composition, I added another industry picture and gave it the destruction. For your inspiration what to do, please see the illustration picture.
Step 11
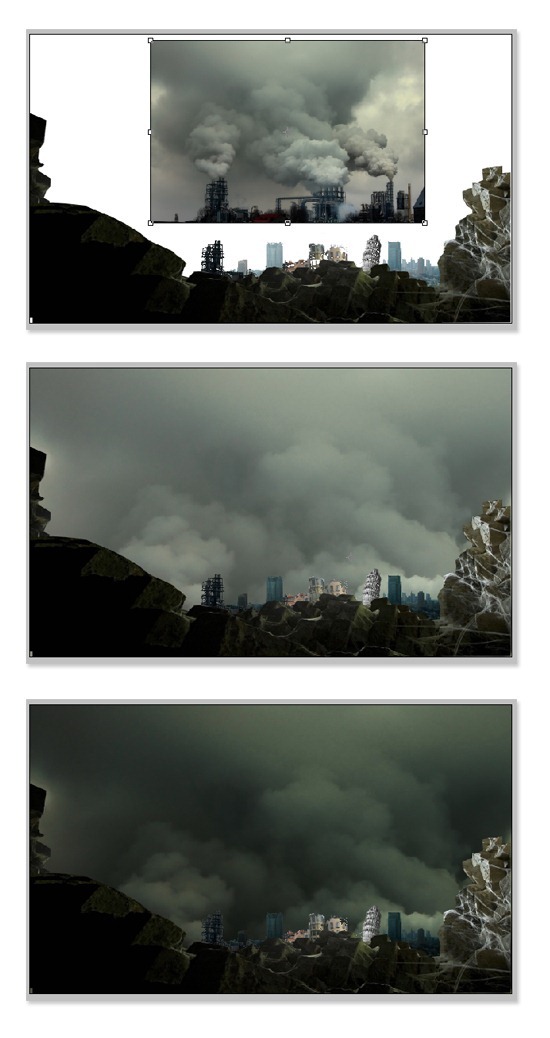
After composing the destroyed city, we will add background to the scene. The background should be thick smoke since the idea of this manipulation is a city on fire. We will manipulate the smoke from the stock picture used before (industry picture stock). Hit Ctrl+T to activate Free Transform Tool. Just scale the picture up. Make sure the smoke part of the picture cover the canvas just like I did in the result I created. I named this layer smoke. Then I duplicate the layer and set the duplication layer to Multiply at 100%. Finally I created a new layer (Shift+Ctrl+N) between the original smoke layer and the duplication one. I filled (Shift+F5) this new layer with #626962. Set this layer to Screen blending at 100% opacity.
Step 12
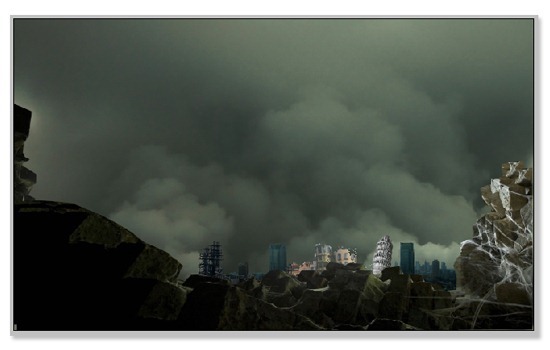
This is the composition I created :
Step 13
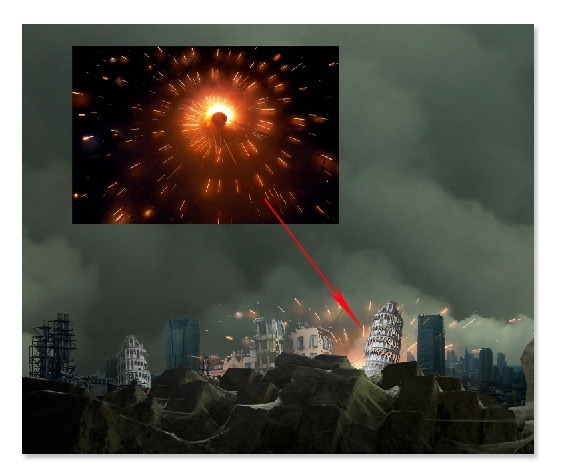
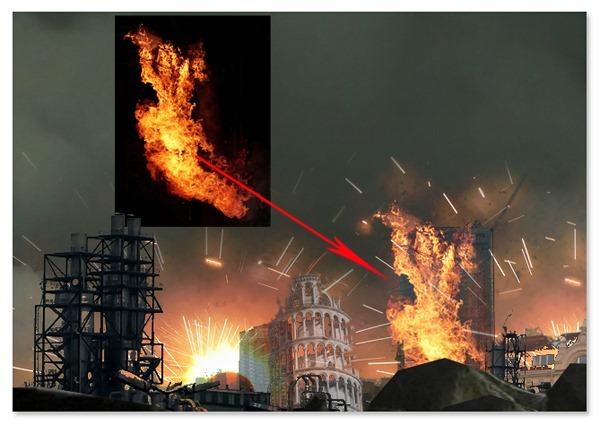
After destroying the city, next is to burn it. Just open the spark picture in the canvas. Scale it to fit the scene. Place it in the position where needed. Make sure that this spark layer is underneath all the destroyed building layers in the layer panel. Set the blending of this layer to Screen.
Step 14
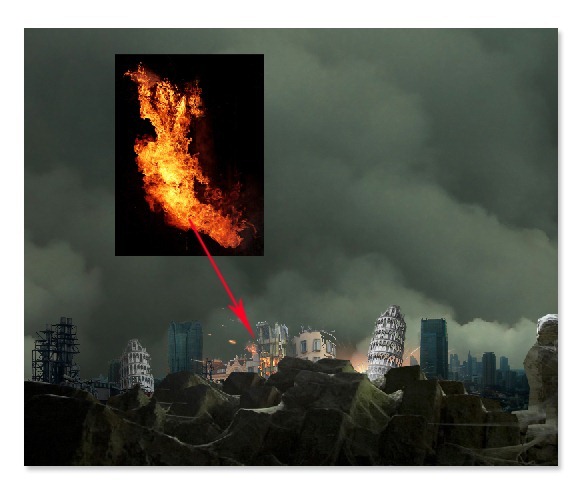
Add fire to the canvas. Remember to scale accordingly to fit the canvas and locate it where needed. Set its blending to Screen at 100%. Mask the edge a little bit .
Step 15
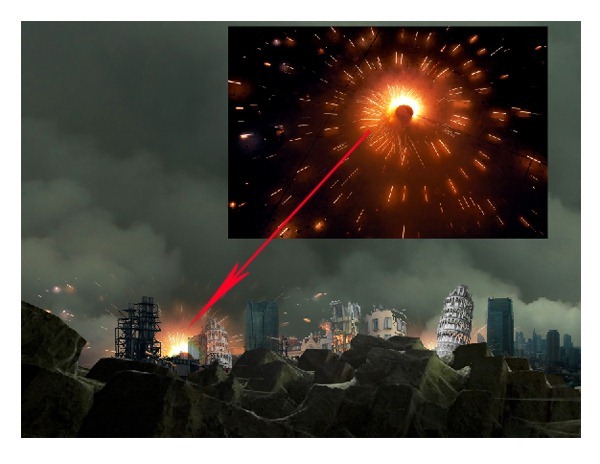
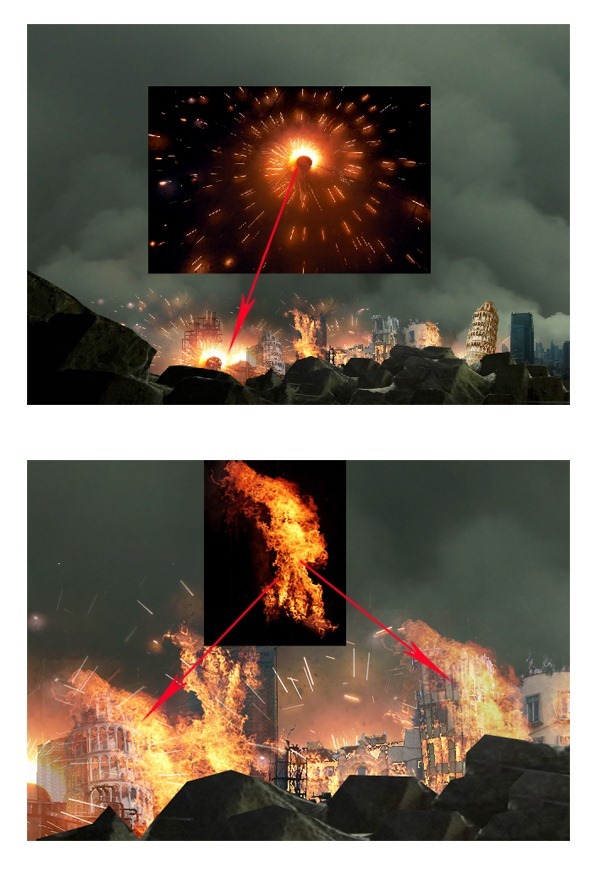
Duplicate the spark picture and place it to the area behind the industry building. Still set the blending for this layer to Screen at 100%. Mask unnecessary parts of the picture.
Step 16
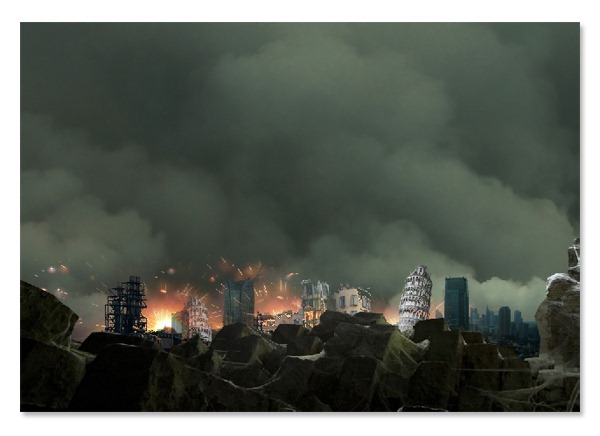
Try to play around with the spark by duplicating this spark layer more, scale and locate the duplication layers where needed to find desired result. Do not stick to get the result exactly similar to the one I created. We can do experiment in this part. Here is the result I create:
Step 17
Add more fire to the canvas. Open the fire stock picture again (or we can duplicate the fire layer in step 14) and make sure this layer is above the city layers created in step 5-6.
Step 18
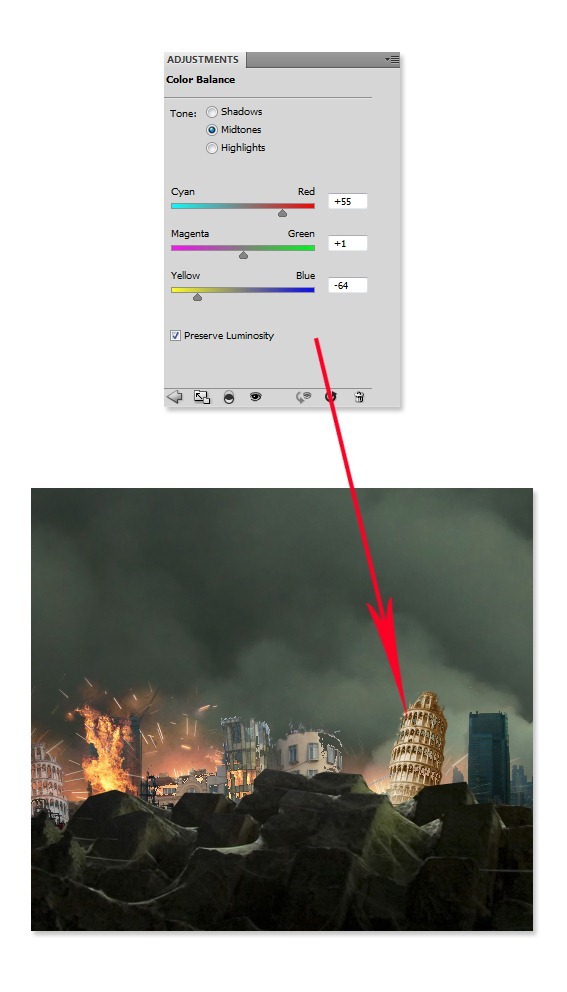
Next, select the tower layer in the layer panel. With this layer selected, go to Layer > New Adjustment Layer > Color Balance. Give this color balance layer a clipping mask. Color balance will make the color of the tower reddish yellow to fit the surrounding.
Step 19
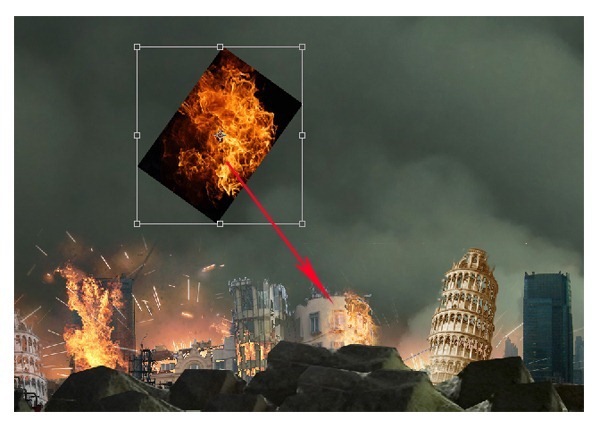
Open another fire stock picture. I named the layer for this picture flame in the layer panel. Place this flame in front of the building. Set its blending to Screen at 100%. Like usual, scale it accordingly. Mask unnecessary parts.
Step 20
Add more spark and fire to the scene in front of building layer. Just try to mess around with fire again to get the desired result.
Step 21
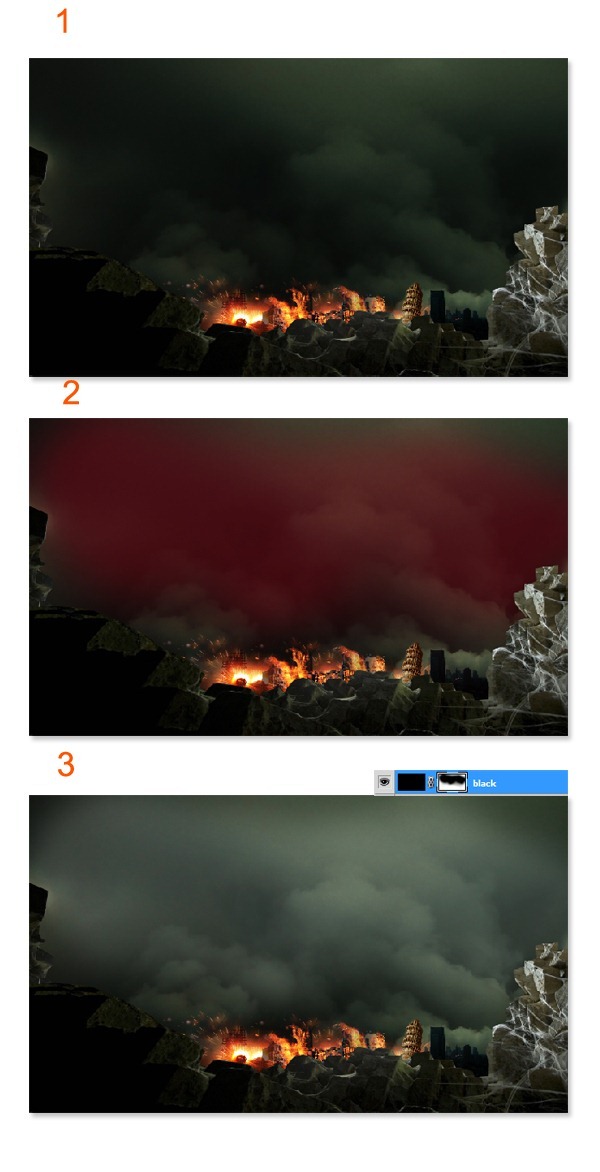
After finding the result, I decided to make the scene a little bit darker. To achieve this I create a new layer filled with black and set the blending of this black layer (I named this layer black in layer panel) to Soft Light at 100% opacity. Create this layer a layer mask and with a very soft brush at 20-30 0pacity, stroke some parts to hide it. Please see the illustration picture to find which parts are. (highlighted in red)
Step 22
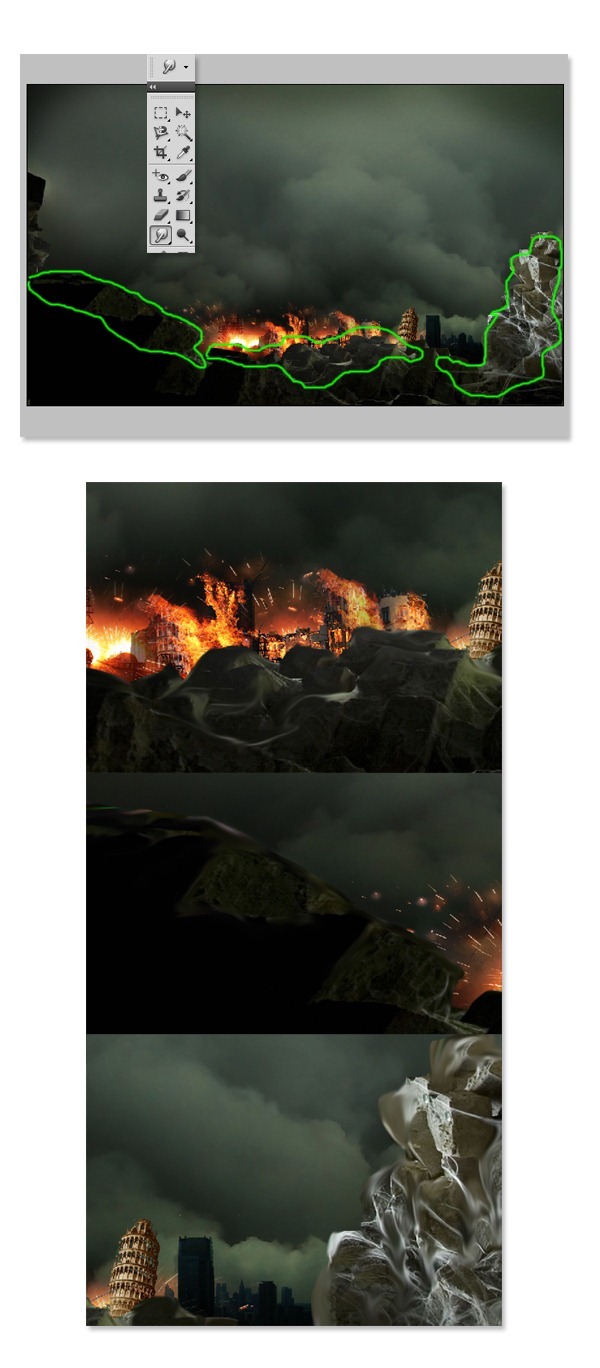
Now go back to the foreground group layer. I decided to blur to the foreground especially to the edge parts. To do this, I used Smudge tool. Take the Smudge tool. Choose a soft brush and set the strength to 70-80. Smudge the parts of the foreground.
Step 23
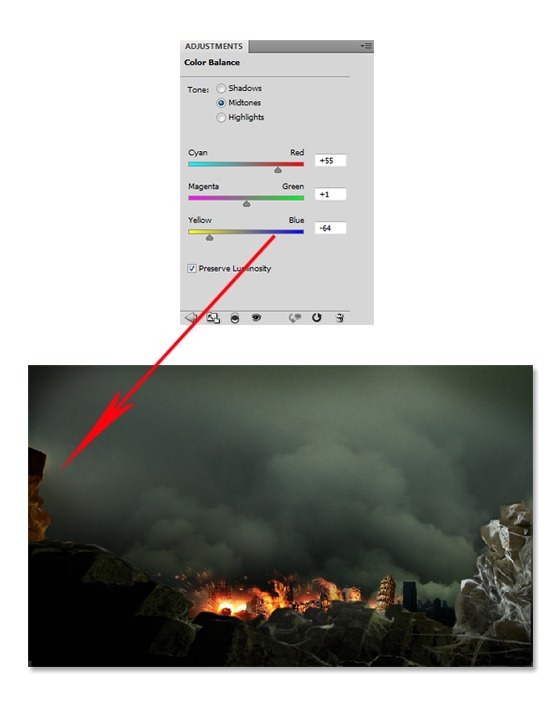
Then I adjust the color of the left foreground with Color Balance.
Step 24
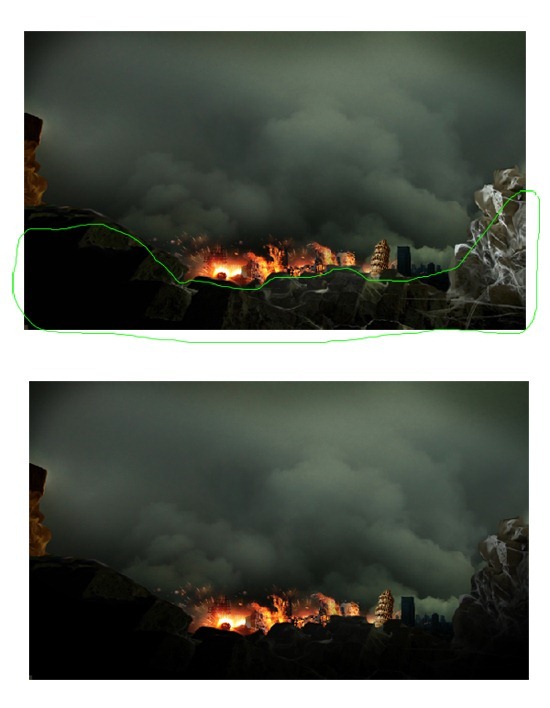
Finally, I decided to add black gradation to the main foreground. Select the main foreground layer. Create a new layer above it and give this new layer a clipping mask. Activate the Brush Tool. Use a very soft round brush set at 20% opacity to stroke the part of the main foreground to give it the gradation.
Step 25
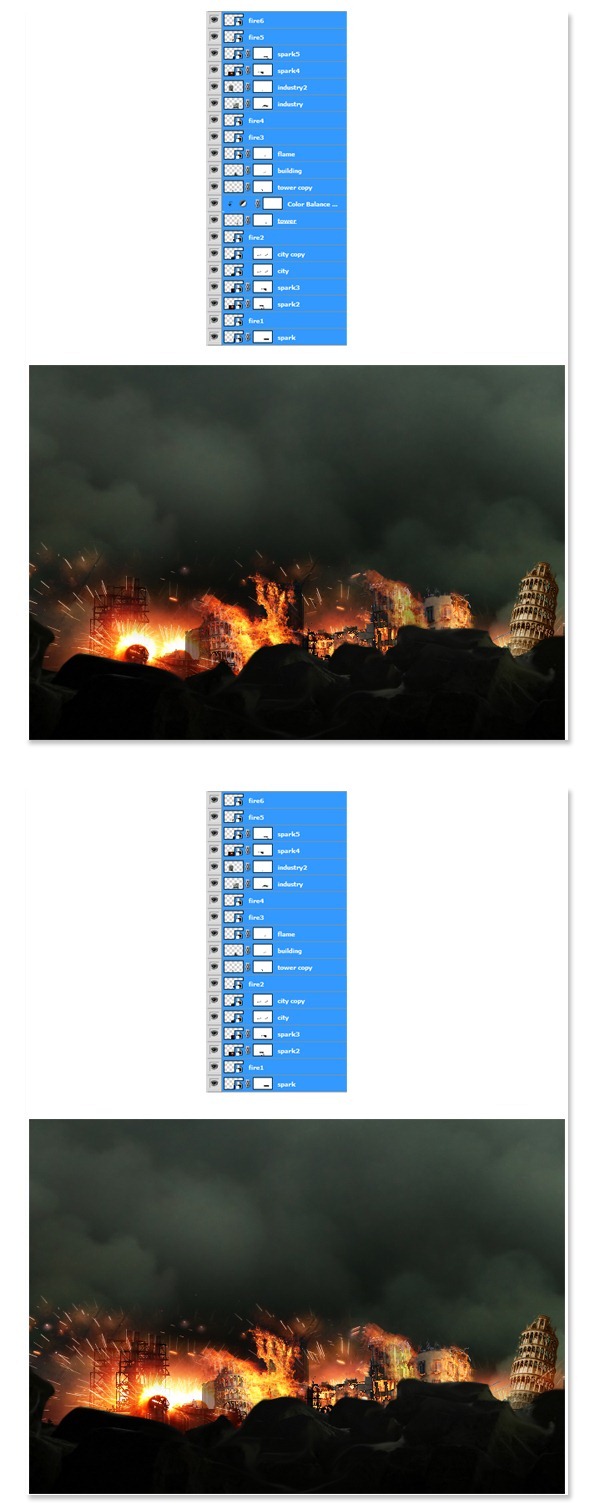
Next, select all the city, spark, fire and flame layers. Hit Ctrl+G to group them. Then, duplicate the group. Scale the duplication group just a little bit. Finally, delete the tower layer in the duplication group. Please see the illustration below:
Step 26
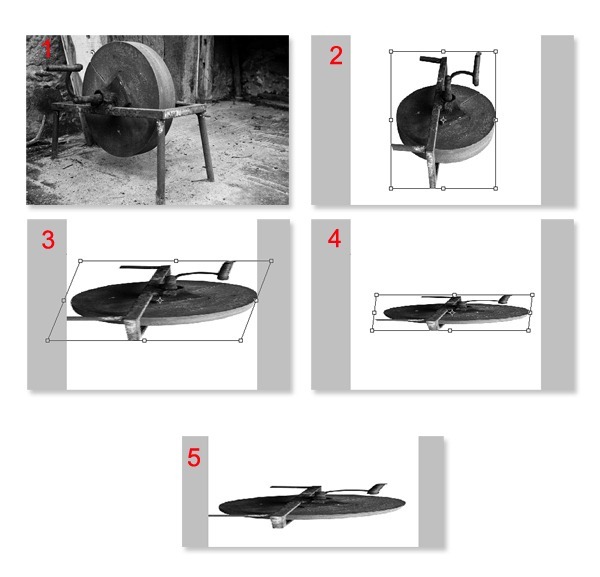
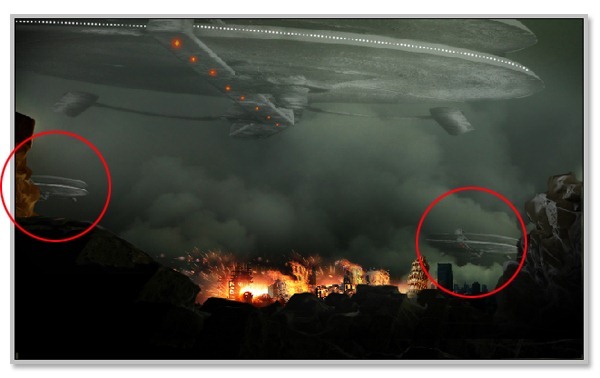
We will add a space craft to the scene. To achieve this, we will transform the provided stock picture. Please do the followings: Open the stock picture. Extract the picture from its background (illustration 1). Next, hit Ctrl+T to activate Free Transform Tool and rotate the extracted picture like the one in the illustration 2. After that, right click on the document to show Free Transform option. Choose Perspective and do transformation to get the result like the one in illustration 3. Distort the shape to get the result as shown in illustration 4. I had the final result like the one in illustration 5.
Step 27
What I did next was flipping the shape vertically. I duplicated the shape and moved the duplication down to the left a bit to get the final shape like the one in illustration 3. Finally, I cleaned out unnecessary parts. Please see the illustration picture for your inspiration. Hit ctrl+E to merge the layers.
Step 28
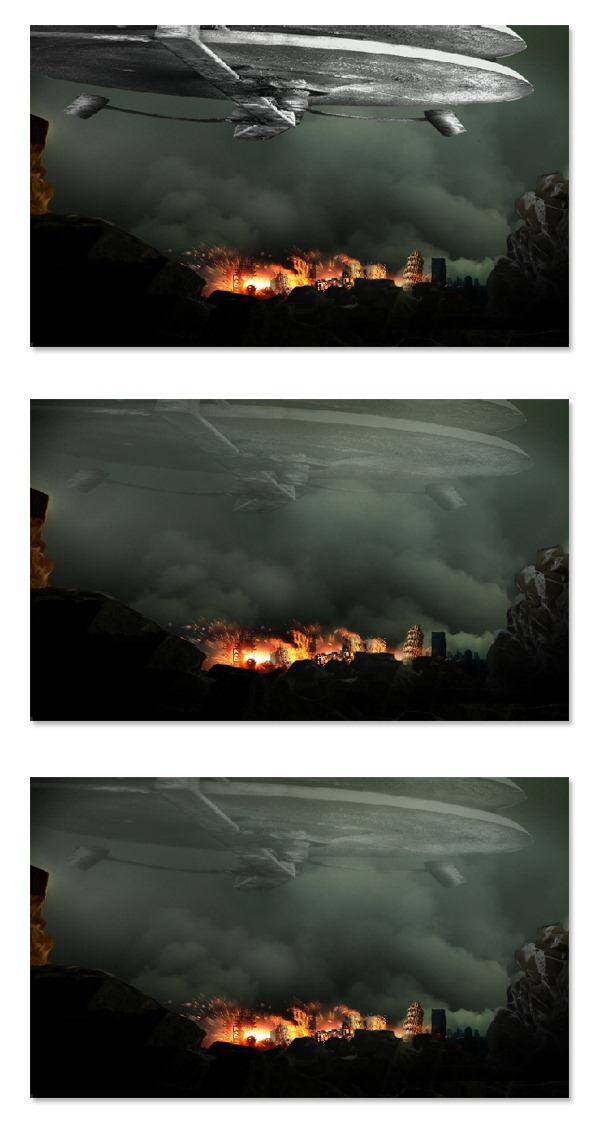
Click and drag the space craft to the canvas. Set its blending to normal at 20% opacity. Duplicate the layer and set the duplication layer to soft light at 20% opacity.
Step 29
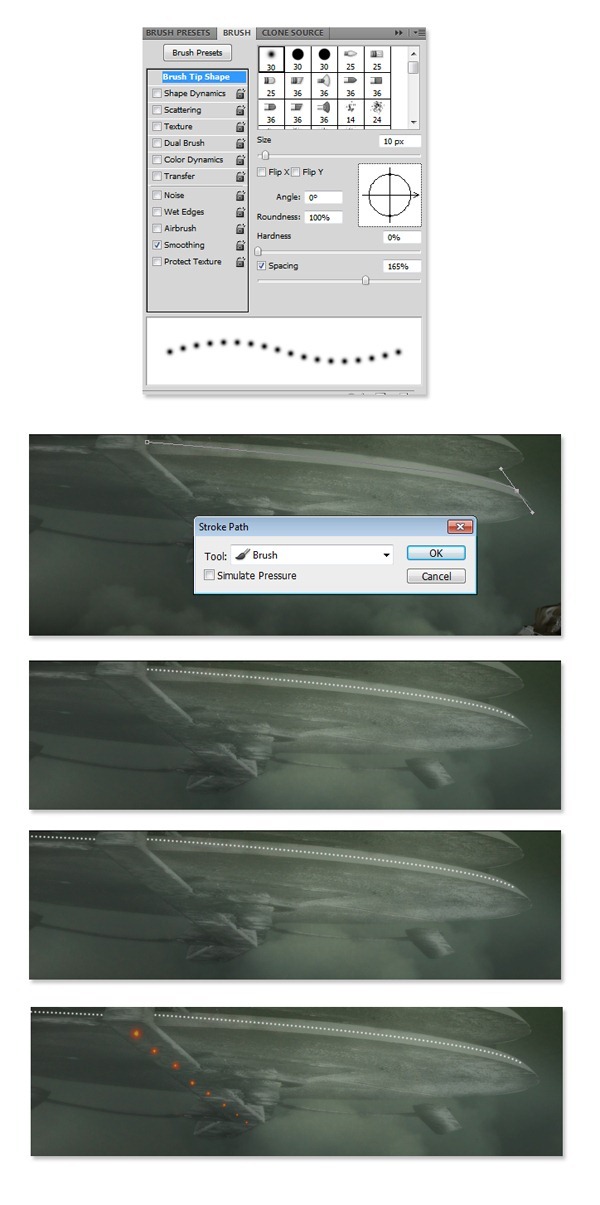
I decided to give light to the space craft. Create a new layer. Activate Brush Tool to choose a very small soft round brush and hit F5 to show Brush Preset. Set the Spacing of brush stroke at 166%. Make sure to set the foreground color to white. Now choose Pen Tool to create path on the craft. Right click the path. When the path option window comes up, hit Stroke Path. Choose brush for the tool. Please see the illustration picture for the inspiration of what to do for this step. Finally, group the space craft and neon layers. I named this group space craft.
Step 30
Duplicate the space craft group two times and place the duplication groups where needed.
Step 31
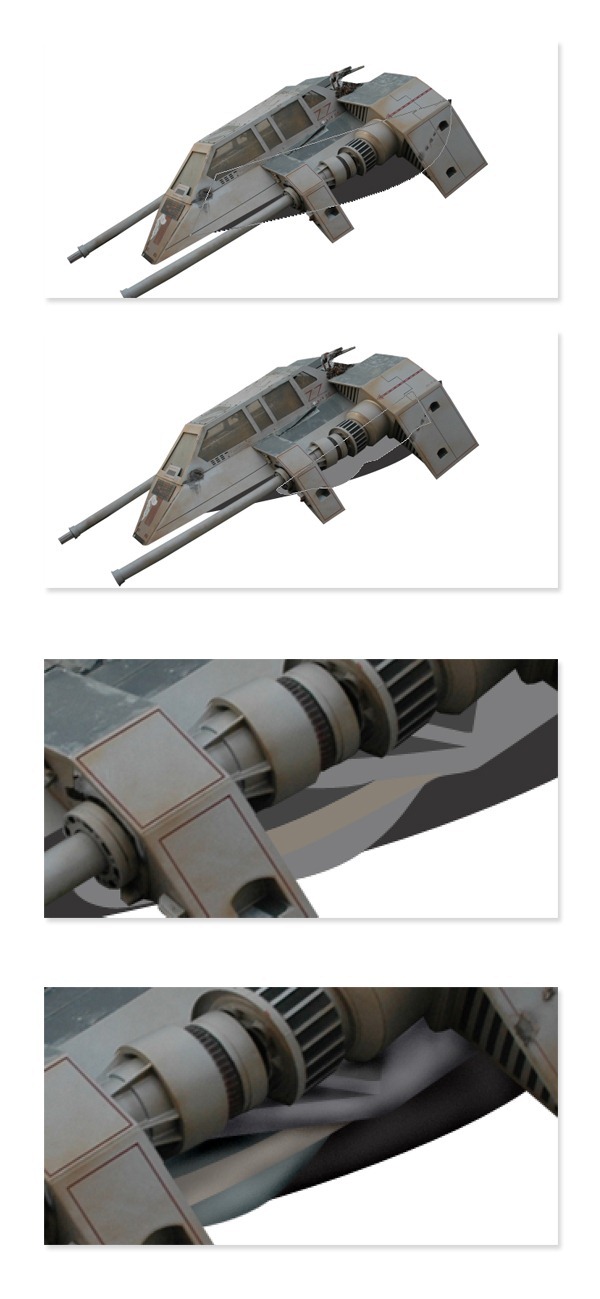
Proceed to manipulate the other craft. Open the provided stock picture to be manipulated. Extract it from the background. When we already have the extracted picture, paint manually a shape for the lower part of the craft. I did it with Pen tool. On a new layer, first I created a path filled with dark grey color. Then, I created another path filled with lighter grey. I proceeded to create the other paths filled with certain color. Finally, with Burn and Dodge tool, I defined more details to the shape by giving it shadow and highlight.
Step 32
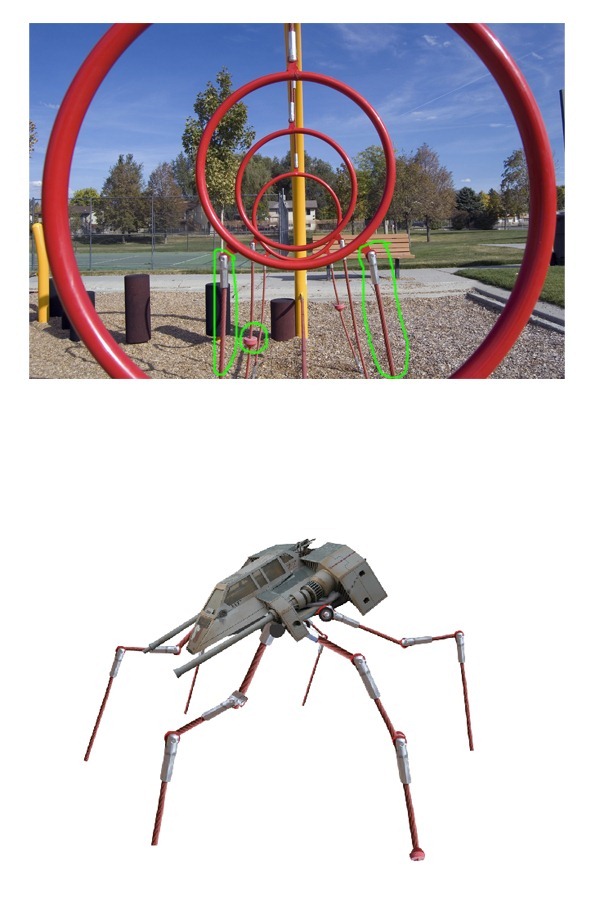
To complete the craft, I added legs which were manipulated from the part of the other provided stock picture.
Step 33
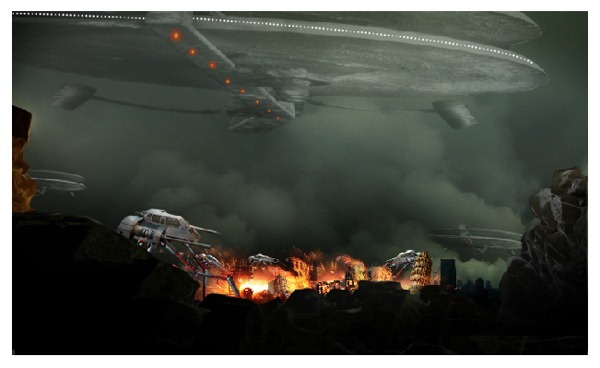
Drag the craft to the canvas. Duplicate it three times and place each of them where needed.
Step 34
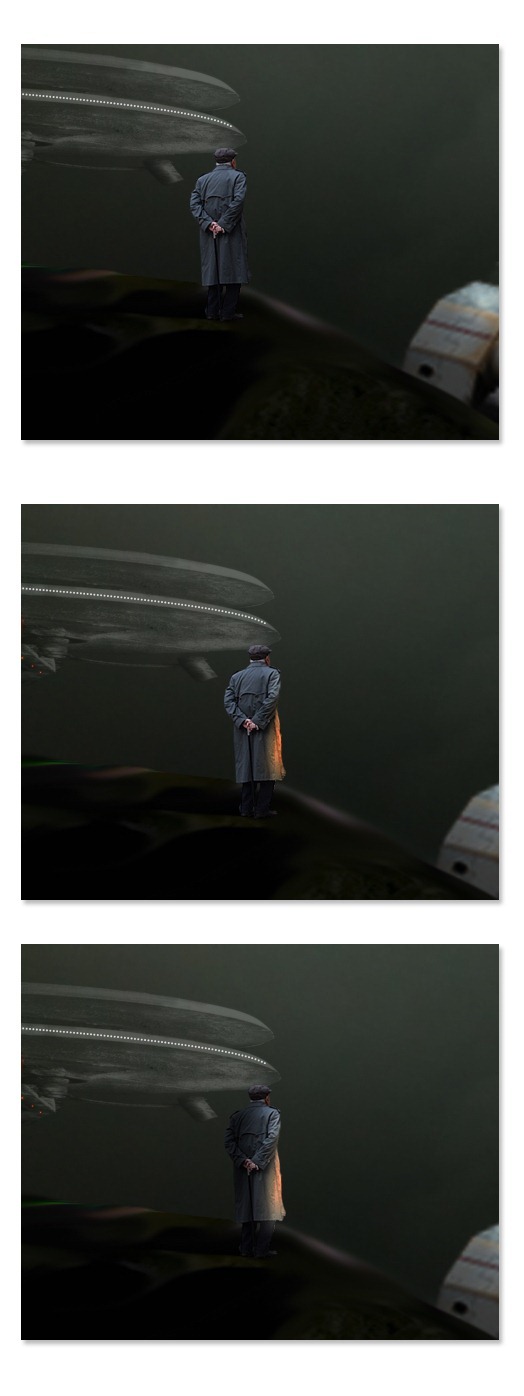
Next I added a man to canvas. Crop the man of the stock picture provided. Scale and place the cropped in the canvas. Create a new layer above the man layer. Fill this layer with black and set its blending to Color Dodge. Choose #fdae03 as foreground color. With a very soft round brush set at low opacity of 4-7%, stroke lower front part of the man’s coat. Finally, on another new layer set to normal blending, stroke the left part of the man with black. Use a very soft brush at low opacity to do this.
Step 35
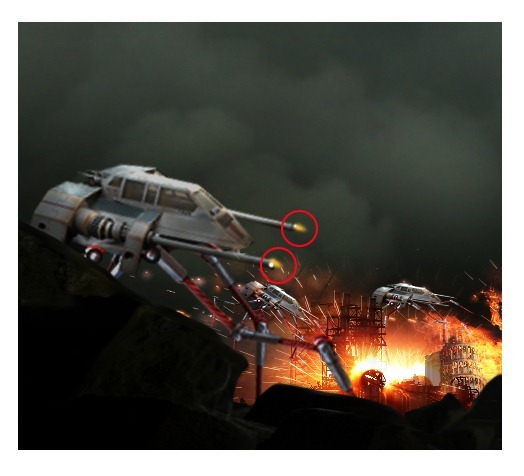
The next step was I decided to add fire to the gun of the craft. Create a new layer. On this new layer, paint the fire with yellow color and then give white spots. This will indicate that the craft is firing.
Step 36
Now we will set the tone of the entire image. I decided to simply give a new adjustment layer: color balance. I just set the midtones of it with the same amount as the ones I created in the previous step 23.
Step 37
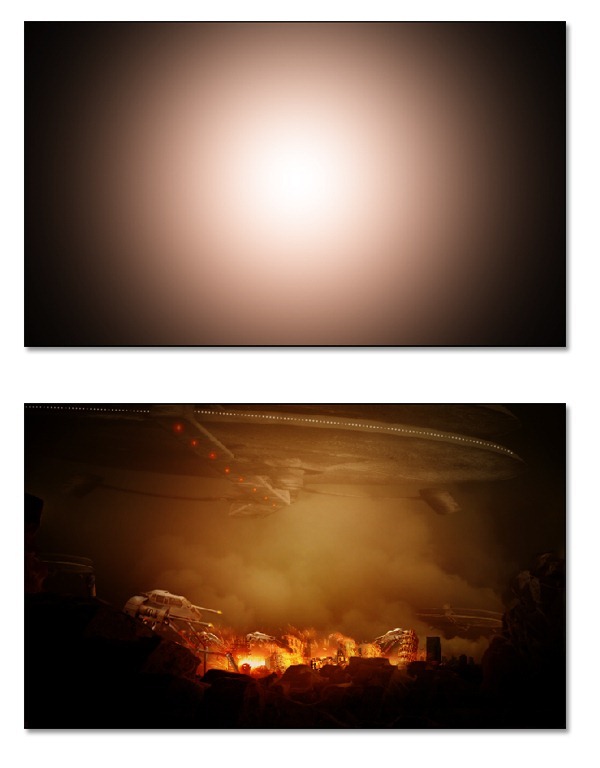
Create another new layer. Fill this layer with black. Set the color of the foreground to #fe5401. With a very soft large round brush, stoke the center of the canvas. Finally set the blending of this layer to soft light at 40% opacity. I named this layer fe5401
Step 38
Next, duplicate the fe5401 layer. Now set the foreground color to white. With a very soft large round brush, stroke the center of the canvas. Set the blending of this layer to soft light at 100%. I named this duplication layer fe5401+white.
Step 39
Create another new layer above the other layer. On this layer we will paint smoke coming out from the firing gun of the craft created in step 35. First, make sure to select Brush Tool and then hit F5 to show brush preset. Set the brush stroke by following the setting as in illustration picture. Make sure to set the size of the brush to a very small size 8-10. Next, with pen tool, make a straight path started from the point of the firing gun. Stroke the path with brush tool. See the result I created in the illustration picture.
Step 40
This is the composition so far.
Step 41
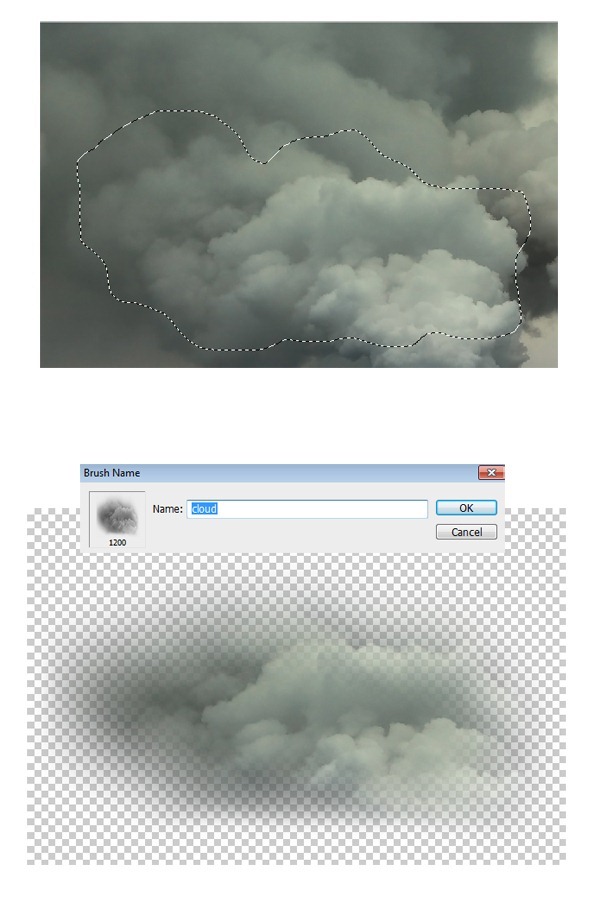
We almost finish the image. I decided to add gentle smoke to the image by consideration that the idea is about a nasty war with much explosion and fire so there should be much smoke around as well. We will manipulate the smoke from the picture previously used in creating the background (step 11). Firstly, I created a custom brush from the picture. Take Lasso Tool to make selection on the picture then set the feather of the selection to 60. Hit Ctrl+J to duplicate the selection into a single layer. Hide the original picture by click the eye icon in the layer panel. go to Edit > Define Brush Preset. I named the brush cloud.
Step 42
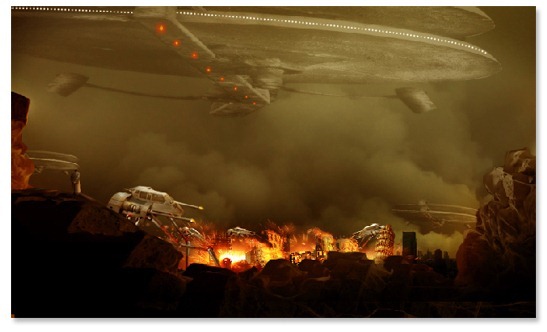
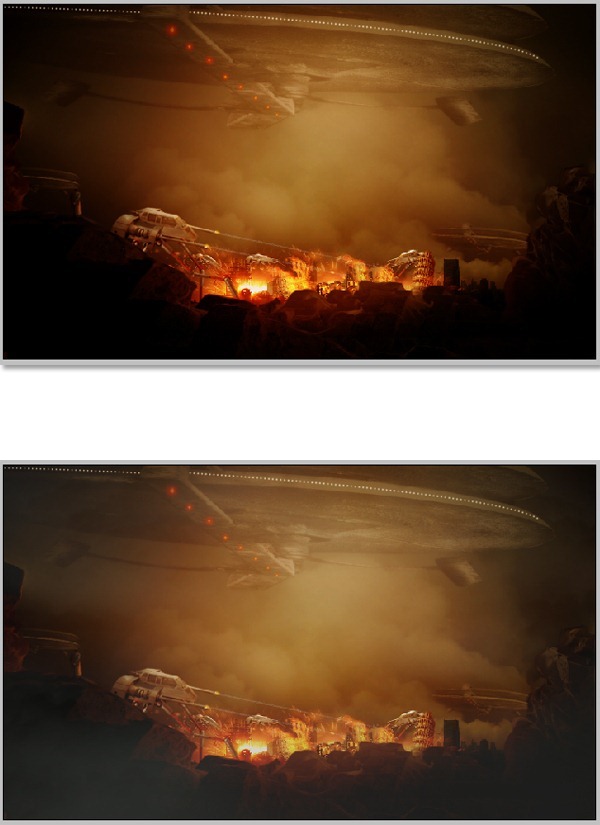
Create a new layer again. Set the foreground color to #ebede9 and #a8a1a1 for the background color. Take the Brush Tool and pick the cloud brush previously made. Set the opacity of the brush to 15%. Now just stroke the brush on the new layer to the entire image. Please see the illustration picture to see the before-after result of this step. I named this layer mist.
Step 43
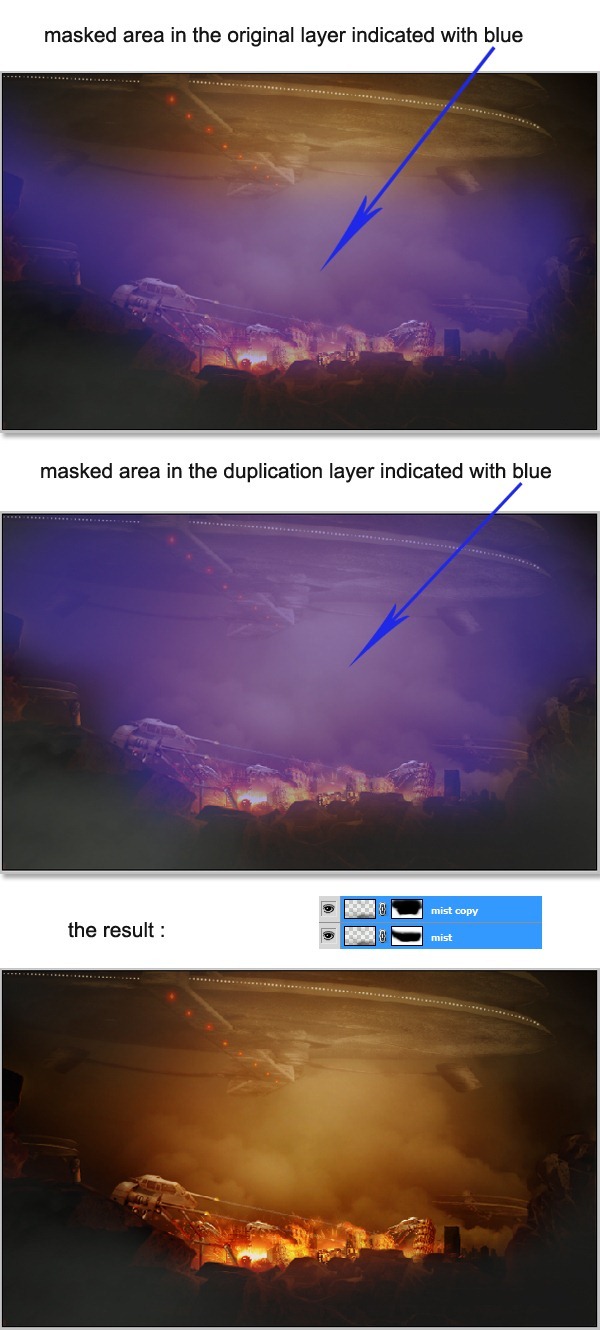
Next step is to duplicate the mist layer. Set the blending of the original layer to normal at 40% opacity. Give this layer a layer mask and mask some area in the image. Now go back to the duplication layer. Set this layer to normal blending at 44% opacity. Finally give this duplication layer a layer mask as well. Mask some area on the image. Please see the illustration picture.
Step 44
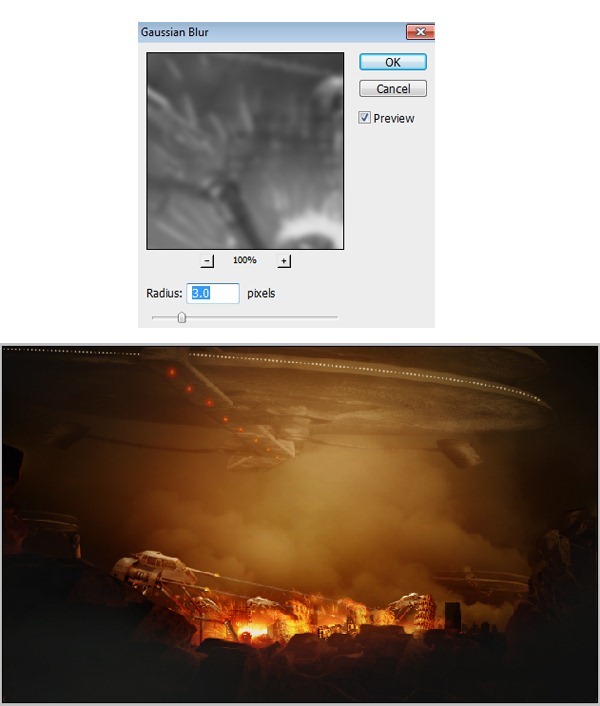
Hit Shift+Ctrl+Alt+E to merge all the visible layers into a single layer. Go to image > Adjustment > Desaturate. Then go to Filter > Blur > Gaussian Blur. Set this layer to soft light at19 opacity. I named this layer blur.
Step 45
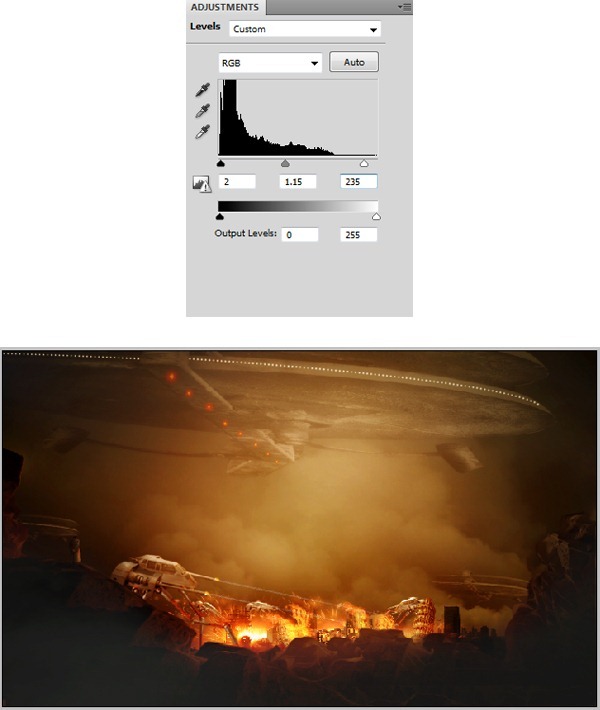
Give the image a new adjustment layer. Go to Layer > New Adjustment Layer > Level.
Step 46
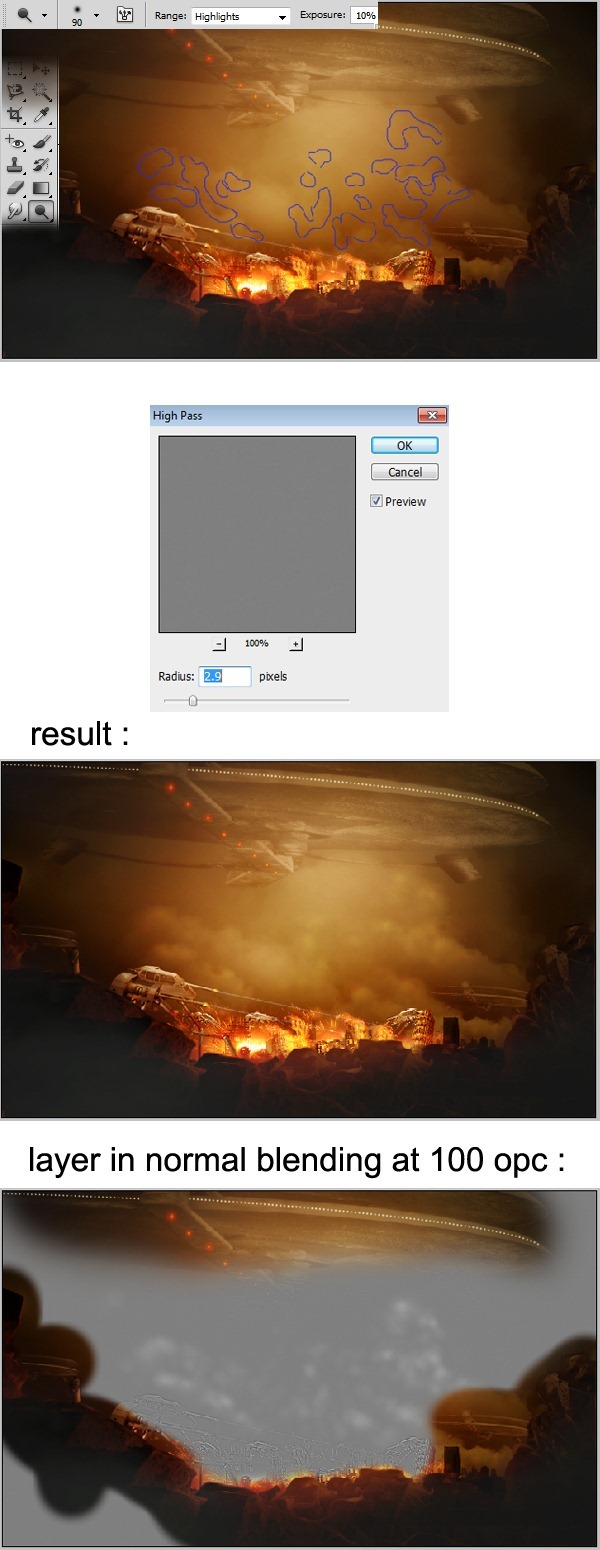
Finally, merge all the visible layers once again by hitting Shift+Ctrl+Alt+E. Go to Filter > Other > High Pass. Set this layer to Overlay blending. Take Smudge Tool, set its range to Highlight with 10% exposure. Stroke the smudge to the smoke parts in the image. This will make the stroked parts brighter. See the illustration picture to see the parts to be stroked. Finally, give this layer high pass layer a layer mask. Mask the foreground and space crafts.


 2:20 AM
 Unknown





![final result[1] final result[1]](http://photoshoptutorials.ws/images/stories/8ffdf0810271_10C1F/final-result1.jpg)
0 nhận xét:
Post a Comment